Monday, December 19, 2011

T’was the night before Christmas…


(that's my boy posing for the camera...I'm so proud)

Anyway,

I had some fun this year making shirts for the kids…and me.

This is a fun, simple way to add a little of your own touch to a T-shirt.

All you need is a white shirt, gel glue and dye.


Pre-wash the shirt then put it over a piece of cardboard that has been covered in plastic. Use the gel glue to write a verse or phrase that you like. You can also draw a picture or design. Let the glue dry at least 4-6 hours.

Once the glue has dried, you can dip the shirt into a bucket of dye. Use any color you want. I followed the instruction but the color didn’t come out as dark as I would like so I would say go stronger on the amount of dye you use.

After the dye process (which takes about 30 minutes to an hour depending on the color and how dark you want the color) wash the shirt in your washing machine and dry in the dryer.

Here’s the one I did for myself.


Have a very wonderful Holiday!!!


Tuesday, December 13, 2011

Hair today, gone tomorrow...

For what feels like forever, my daughter and I have been growing our hair out to make a donation. While it might not seem labor intensive it didn’t come with out its hurdles. When you have a 6 year old there can be a few battles about knots and tangles in her hair. I mean you pull a blanket over your head and run around trying to scar your bother and there is a fair amount of static built up. Crawl around in the grass and dive under that tree to get a ball and your going to come out with some issues.

Bath night is always such a joy. Thank goodness it’s hubby’s job. “Daddy that hurts” “Daddy, your pulling too hard” “Stop yanking on my hair!” Aahhh the memories they’ll have.

I know I sure went through an awful lot of conditioner. And this may sound strange but I get hair headaches. Don’t laugh, it’s true. All that hair pulling down can make your head tired. And if you pull it into a pony tail that get’s it our of you face but man…nothing feels better that taking it out at he end of the day!

So for a few years there has not been more than a tiny little nip to the ends of our locks. My daughter had her hair in a braid most of the time just to keep it somewhat under control. I did what I could to make mine look presentable and tried to keep from looking like one of those older women desperately holding onto youth by having long hair. Not sure I pulled that off??

Either way, the time had finally come. We reached our goal of 12 inches. We took some time one evening taking a bunch of silly hair photos. Then this past Saturday we were off to the salon. The first time ever for my daughter. I always cut the kids hair at home so they don’t know what the salon is all about. She had a few questions on the way about where she was going and what they were going to do to her. Would she be in a different room? Was it going to hurt? How would they do it?

She was such a wonderful little trooper!!! The look on her face when they washed her hair and massaged her head was priceless. I think she’s ready to move in there.


Silly Moustaches...


Cousin it...


Yes, that is the front of our faces...


Ponytails GONE!!!!


Before and After....


What do ya think?

Big difference huh?

Here and here are a few places you can check out if you’re thinking about donating hair.


Monday, December 5, 2011

Tis the Season...

It seems that this time of year more so than any other brings people together socially. I’m someone that could stand to plan a gathering and do something festive all year around. I love to have friends over and have that “party” atmosphere. Sometimes it can be as simple as having another family come over for pizza night. We have the kids make their own pizza then send them outside to run themselves silly while the grown ups talk.

Other times it’s a bigger gathering with more of a theme. I have a pumpkin carving party every October, where the neighbors come over and we eat tons of food and carve our pumpkins then line them up on the step out side to take an after dark pumpkin picture.


You could invite a bunch of people over and ask that everyone brings an appetizer. That always seems to be a hit. I love appetizers, why not make a meal out of them.

Or host a cookie exchange. Get 10-12 bakers organized and each participant makes 10 -12 dozen of one type of cookie. Then you come together and swap so you go home with a tray filled with all sorts of different treats and you didn’t have to spend days and days in the kitchen. This concept works well with soup too. It’s so nice to have a freezer filled with containers of soup all winter.

This past weekend I went to a Gingerbread decorating party (without kids). It was so relaxing to sit back with some wine and decorate our houses while catching up with our gal pals.

Here’s my creation….

To keep the festive feeling going, I had a Christmas party the next day with just my family.
I pulled all the tree trimming supplies out while hubby mad a few bloody marys.


The kids got to decorate their own gingerbread house and since I had already done mine, I was less “type A” about how they did their decorating. Worked out great for all of us.


Hubby strung the lights while the kids and I worked on the gingerbread house and then we all moved in the living room to hang the ornaments.


I guess I was focused on the tree and sadly my house did not survive for very long.


What fun ideas do you have for sharing time with the people around you??


Tuesday, November 22, 2011

Just Say'n...

I love Halloween. I think it’s a fun holiday that brings out your inner rock star or gives you the chance to be something different…out of character, even if for just a day. Plus you get candy to boot. Nothing wrong with that.

Then BAM, we’re into Christmas??!??

While I’ve never been much of a Christmas person. I am seeing it differently now that I’m a Mom. I am working at finding the magic of it each day. However, I think it is commercialized to the hilt and that it can be difficult to see the magic through all the extra hustle and bustle, the increase in traffic, the over-stocked shelve and crowded isles. It becomes so easy to loose sight of that little baby. I mean that is what created this holiday, right? That tiny baby, in that far off land…born in a barn. Any of this ringing a bell? I think that story gets a little misplaced sometimes when the grouchy driver is blowing his horn or the snarky sales clerk grunts at you.

Anyway, all of that aside there is a holiday that’s falls between the two. Anyone? Anyone??

I know, I know, it doesn’t get much attention. Well, I mean how much can you commercialize a day about food? It’s about food isn’t it? Oh, wait, no, that’s why there is so little attention to the day. There aren’t too many ways for someone to make a buck. Unless you’re a grocery store but everyone eats all year round anyway so not a huge difference here.

They don’t write songs for it. (That’s why the Christmas music starts the day after Halloween). There’s no over packaged candy or treat. No magical fairy tail land to make a movie about. But it is something deserving of a little attention. So, while you’re eating your “fun size” candy out of that black and orange wrapper and listening to How Grandma got run over by a reindeer, take a minute to be grateful. Think about something you have struggled through and overcome. Think about a new friend you made. Think about those who have sacrificed so you could have more. Think about the things you are grateful for and it will help you get ready for the next holiday. The one about that baby.


Meanwhile, from Me


The Hubby...


And our three little turkeys...


Have a Wonderful Thanksgiving!!


Wednesday, November 2, 2011

Subtle Decorating

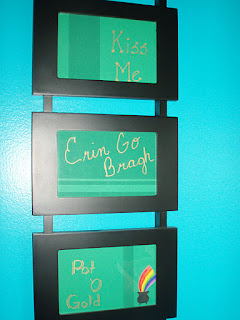
After repainting most of the rooms in my house I was on a mission to also come up with new wall décor. For the one wall in my kitchen I already had two metal pieces that I thought would look good against the new color. Then I found a triple picture frame that would be just right for….

Hmm??? Something?

I liked the shape and that it would hold three photos. I thought about maybe adding some black and white photos of each of the kids. Then after I had it in place I thought it would be better put to use if I could pull the colors of the room together.
The rest of the living room - kitchen space has brown, beige and little pops of apple green.

I tried to stage photos of real items that I could then use in the frames but I wasn’t having much luck at the time with getting the right look out of the pictures. Then I found some scrapbook paper that would do the trick nicely.


I wanted mushrooms to pull out the beige color but the sepia image of the daisies works too. The green apples were perfect. I originally wanted coffee for the brown color but the chocolate made for a good substitute.

It didn’t take long for my brain to start spinning out new ideas on what other things could go in those frames. It quickly turned into the perfect place to add holiday or seasonal decorations. I made them all on the computer or added some simple artwork by hand.

Here’s the one I use during Halloween


For now, this is what I have for Valentine’s Day.


I put these three together last St Patrick’s Day.


This one is for Easter.


I put this out for the fourth of July.


Next month I’ll get this set in the frames for Christmas.


Right now I have a simple “Give Thanks” in there.


It reminds me daily that I have so much to be grateful for.


Do you have any ideas for subtle decorating? You know, something simple in a tiny space that is a little unexpected.


Check out some other cool ideas here.


Sunday, October 30, 2011

Bewitching Bottles

I love to decorate my kitchen windowsill with bottles. You can see here that I used to collect different colors and change them out for various holiday/seasons. After I redecorated the kitchen/living room those colored bottles didn’t seem to work any longer.

Until Halloween…Then anything goes, right? For the last few Halloweens, I’ve been looking at bottles at the craft store that have spooky labels on them. I never bought them because I always thought they were too expensive. So this year I decided I was going to make my own.

Late August early September I emptied a small bottle of pinoli nuts. I liked the shape and at first I thought it would make a nice tea light holder. Then right after that my husband emptied a glass bottle for one of his meds. Then I realized I could use both of them for something fun and the challenge grew. A quick look around the pantry and in the frig and I realized that in no time I could manage to empty out several bottles and use them to make my “Potion” bottles.
Once I had a few bottle together I started getting them ready. I washed them out and removed the labels.


For the more resistive labels, I used cooking oil on a paper towel to loosen the adhesive. After they were all label free, washed and dry it was time for some paint. I have seen some people use acrylic paints to decorate their own colored bottles but they all seem to look streaky. I heard that oil based paint might work better so off I went to the home improvement store.

I bought a half pint can of high gloss black oil base paint and I was good to go. I poured about a third of the paint into one of the bottles and rolled it around the inside. Then poured the rest out into the next bottle and so on until all the bottles were coated with paint.

While the paint was drying I got started on some labels. I wanted to find some brownish, parchment looking paper but didn’t want to pay for it so I used regular white paper. I found a list of “ingredients” by googeling “witches brew”. I found a few fonts that looked the part and printed them out.


To give the paper and aged look I used shoe polish. First some tan and them around the edges with brown. I tore the label and used a match to burn the edges. Glued them onto the bottles and lined them up on the windowsill.

Now it looks like all I need is a cauldron and I’m ready to get started on a ghoulish concoction.


Here’s a list of the “ingredients” that I came up with…

Old Hag Cackle Extract
Vanishing Cream
Mummy Dust
Black of Night
Eye of Newt
Toe of Frog
Wool of Bat
Toil and Trouble Tonic
Ear of Troll
Dragon’s Breath
Hell Broth
Vanishing Cream
Mermaid Scales
Poison # 26
(Only use after midnight)


Not all the bottles were painted. I kept a few clear so I could fill them with different things. The poison bottle has purple colored water,


the mummy dust is a mix of salt and pepper.


and the hell broth has red colored water.


Did you guess what any of the bottles were used for originally?

From left to right…

Blue Curacao
Sambuca
Green Olives
Porto
Red-hot sauce
Florastor
Tonic water
Capers
Tequila
Pine nuts
Sesame oil
Taco sauce
Red-hot sauce #2


Have a fun Halloween!!


Friday, October 28, 2011

No Sew Halloween Costume

I like to make some or all of the kids costumes when I can. This can be tricky if they choose something challenging or when they are changing their minds every few days. I have learned to wait until I get really close to the Halloween before I purchase any supplies. This year my son (3 yr.) started off saying he wanted to be Buzz Light-year. That is what he went as last year and I’m not so sure he understood that he could be something different. Then he said he would be a fireman. Great. We have a hat in the dress up box and his coat has some bright yellow on it so we’re most of the way there.

Then he said he WAS NOT going to be a fireman! Ok, now what?

I asked what he thought about a skeleton and then his face lit up with excitement.

I had an idea that was going to make this the easiest costume for Mama to make.
Wooo Hooo!!!!

I already had all the supplies I needed.


Black pants and a black T-shirt. Already had those items in the dresser.
A sheet of craft foam. Had a large enough piece left from a previous project. (ok, so I’m part pack-rat)
White(ish) contact paper. I had some left from lining dresser drawers and I had used this same stuff when I did the ceiling fan makeover in our bedroom. It looks a little like white/gray marble when you see the whole sheet but cut up I thought it would be perfect as a dirty bone.


I used my seam ripper to remove the pocket from the T-shirt.


I made some rough sketches of bones to use as a pattern. I first cut them out of paper and then traced them onto the back of the contact paper.

It took a little time to cut out all the bones but I sat on the living room floor and watched Jailhouse Rock while I tinkered away at the costume.


I used google images to find the outline of a skull and then traced that onto the craft foam. I cut out the eyes, nose holes and a slit for the mouth and then used a marker to draw in some details. All that is left, is to staple a piece of elastic on and the mask is all done.


I had some gloves that I found last year that have bones on them but you could use the same technique as the rest of the body if you want to. The best part is that I can peel the contact paper off after Halloween and use the pants and T-shirt again.


I think he’s going to look pretty cute.

What’s your easy last minute costume idea???


Tuesday, October 25, 2011

Something for the walls... part two

Several months ago I saw this new (new to me) technique to use aluminum foil to give a contemporary look to a common piece of furniture. I came across a blog (I wish I new which one) that had done this technique on a small dresser/ side table. I wanted to give it a try but on a smaller scale.

I had my eye on this tray for a few weeks and it finally got marked down and moved to the clearance section. At $4.00 I couldn’t go wrong. It was already cream but to make sure it blended with the other items in the room, I gave it a light coat of paint.


I cut several pieces of foil into various sized squares and rectangles. Then I used decoupage to adhere them (shiny side down) to the bottom of the tray. I glued a small picture hanger to the back and on the wall it went.


Hmm, I wonder what I can do this to next??????


Wednesday, October 19, 2011

Something for the walls...part one

After repainting the powder room I needed to also update the decorations on the walls. I held onto an idea for a while but needed the supplies and the time to put it all together.

I started an obsession over frames almost two years ago. I wanted to find some realty big frames for our family photo shoot in the park. Big enough to hold up around us while we got our picture taken. I found two while on vacation at the beach in 2010 and they worked out great. I just couldn’t stop. I kept finding frames and a new collection by surprise began.

During one of my stops at a local antique store I found this frame for $2.00.


At the time I didn’t know for sure what I would do with it but I couldn’t pass it up.

$2.00!!!!


Ok, so it needed a little love.


I removed the backing and pulled all the pins and staples out. A good sanding and a few coats of paint and it was as good as new. I sanded a few areas a little more to give it an aged look but a clean and pretty aged look.


Next, all it needed was some chicken wire. Not as easy to come by as you might think. I did find small rolls at a local hardware store but the smallest roll was $21.00. I just couldn’t justify spending that and only needing about one tenth of the roll.


Father-in-law to the rescue. We stopped in there for a quick visit on our way to the beach this past summer. (They live half way in our trip East) He has one of those Grandpa like garages that has a little of something left over from every project he has ever done. Low and behold, in the corner behind the fishing rods was a tiny roll of chicken wire!!!! Perfect! (and free)

Tacked a piece on the back of the frame and added some black wire to the top as a hanger.


Now all it needed was a few decorative clothespins. I glued strips of scrapbook paper on the clothespins and sanded the edges.


Now I can pin up cute little notes.


I saw a bunch of frames at that same antique store just yesterday…Should I go back and get them????